
formerly known as Microsynth 8

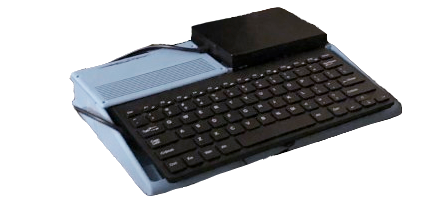
im like, very interested in old school game consoles and home computers. and i had the crazy idea to make a computer that plays Famicom cartridges. i basically designed my own famiclone. (in the most jankiest way possible)
i started with 3d printing the case, specifically this one.
unfortunately i had to resize the model, so that means the ports wont line up. not to worry though, i can just use a cutting plier and get around that problem.
oooh this one looks cool.i used a raspberry pi 4 to power the computer part of the machine. just runs raspberry pi os 64 bit with xfce4.
i made it boot into command line mode first, then made shell scripts like ./load.sh and ./workbench.sh. just so it would make typing commands a little easier. load.sh lets you load stuff from floppy disks, and workbench.sh loads xfce4
next, i installed retroarch on it (ofc), and installed all of the cores, and made another shell script for running games. i cant exactly recall how it works, but basically if a certain filetype is detected, a specific core will load.
run.sh load.shi'll mainly just use it for retroarch and some web browsing.
one pretty cool thing i installed was a 3.5 inch floppy drive just cuz. i put some NES and PC Engine roms on some floppy disks i have.
now for the famiclone part. i was pretty happy to receive this. i bought a Yobo FC from ebay for the sake of making this Microsynth play Famicom games. It's perfect cuz it fits inside the computer and i can use one of the parts for another project. it's one of those super cheap NES compatible clones. my plan is to use the motherboard and add it to the computer. if it breaks, then i can just buy another. its that cheap, lol.

the build quality is just complete dogshit. the AV cables were really tight, but the cartridge slot was even worse. I inserted a 60-to-72 pin adapter, but the cartridge slot was so tight that i could never remove it, so ig its gonna be stuck like that (might be the cartridge itself, but idk). so anyways i took off the top case and placed the bottom case housing the motherboard inside the Microsynth. later i will use the top case for the Microsynth 2.

now i noticed something weird. you had to insert the famicom carts backwards for them to work. so in the Microsynth, i just mounted the motherboard backwards. and this kinda ended up being better. now the cartridge goes in the "correct" direction, and the controller ports are mounted at the back, which would make sense.


how it looks

moving foward, i made an opening for the cartridge slot, and cut holes in the back side so that i can easily plug in cables and controllers.

later, i swapped the cheap, chicklet keyboard with a 60% red switch mechanical keyboard made by Snpurdiri. fits ok-ish, and the typing feels very nice. my plan is to take some corrugated plastic sheets, and cover the gap between the keyboard.
i also bought some nes controllers too, and the nes games play just fine.


after that, i focused on the software side again, and added a custom boot prompt on startup which tells you to load in any floppy disk, and it continues to the command prompt. if you want to skip this, you can always press ctrl+c.
startup.shhow this works, i edited ~/.bashrc and added this line: /home/user/startup.sh
oh, also next im going to add a usb hub so i can plug in usb stuff more easily
finishing touches:
i added a usb hub so plugging in stuff is easier. i also added this SATA plug for hard drives cuz i just wanted to.
i also want to reinforce the shell with hot glue, and then paint the shell black.


later i replaced the nes clone with a usb famicom dumper made by ClusterM which i bought on AliExpress.
check it outdont worry, ill use the nes clone for another project ;>


now this comes with some pros and some cons.
the pros are that the dumper can interact directly with the os since its a usb device. this makes it much more easier to play your famicom games without the need to switch video output cables(like imagine lol). the design also looks cleaner and doesnt look awkwardly tall.
and the cons are that if you have a famicom cartridge with a mapper chip, you will need to specify the mapper number. this will also mean that some bootleg cartridges wont work, or wont run correctly.
you can check this website out to find your cartridge's mapper number.
Nes Mapper Listconclusion:
i think i am finally finished with this build. the built in famicom works, the floppy disk works, the os is all good. unfortunately i cant make more of this computer or sell it, because i no longer have access to a 3d printer.
i might be able to make a similar model and base that off of a dvd player or something, but im gonna be saving that for way later.